
Budget Grill Area DIY Guide and Reviews (Complete 2026 Beginner-Friendly Guide)
Discover the complete 2026 DIY grill station guide including patio grill ideas, must-have accessories and beginner friendly grill reviews.
Creating your own budget-friendly grill station doesn’t have to be expensive or complicated. Whether you have a small patio or a full backyard, you can design a stylish and functional outdoor grill station using simple DIY methods.
Why a grill station transforms your outdoor space
Most people start with just a grill sitting on bare concrete or grass, and while that works, it creates a frustrating experience — tools get misplaced, there’s nowhere to prep food, and everything feels chaotic when you’re cooking for guests. A dedicated grill station solves all of this at once. It gives you a command center where every tool has a home, your food has a prep surface, and the whole setup looks intentional rather than thrown together. Beyond function, a well-built grill station genuinely increases the enjoyment of being outside. It signals to guests that this is a real outdoor kitchen, not just a backyard afterthought. Property value aside, it simply makes summer evenings more pleasurable.
The five best budget grill station ideas — expanded
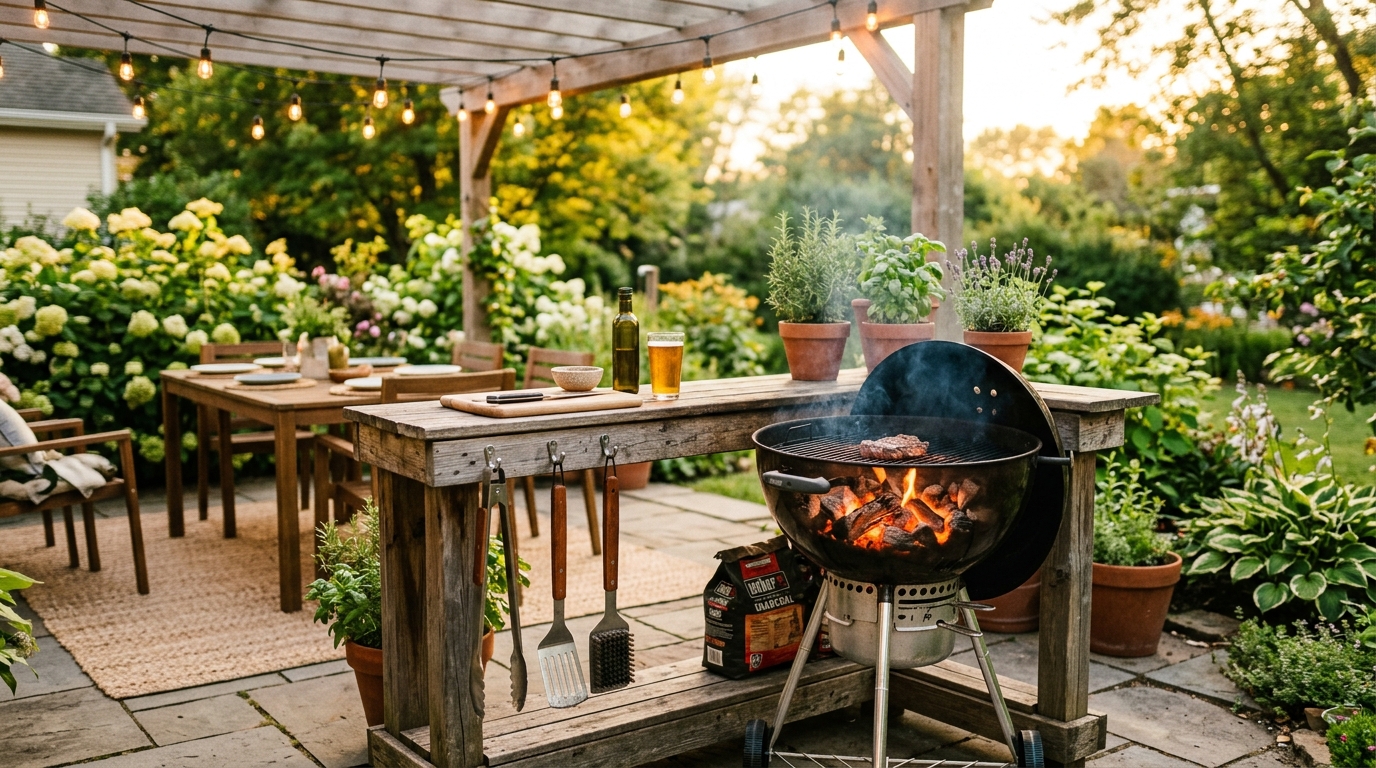
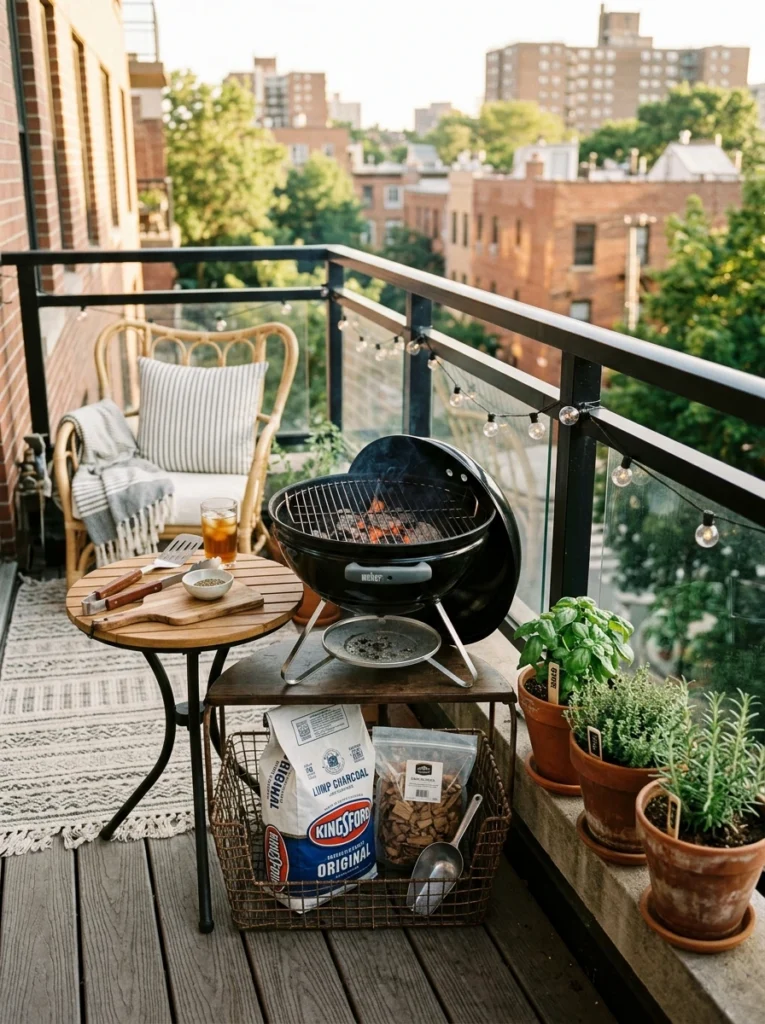
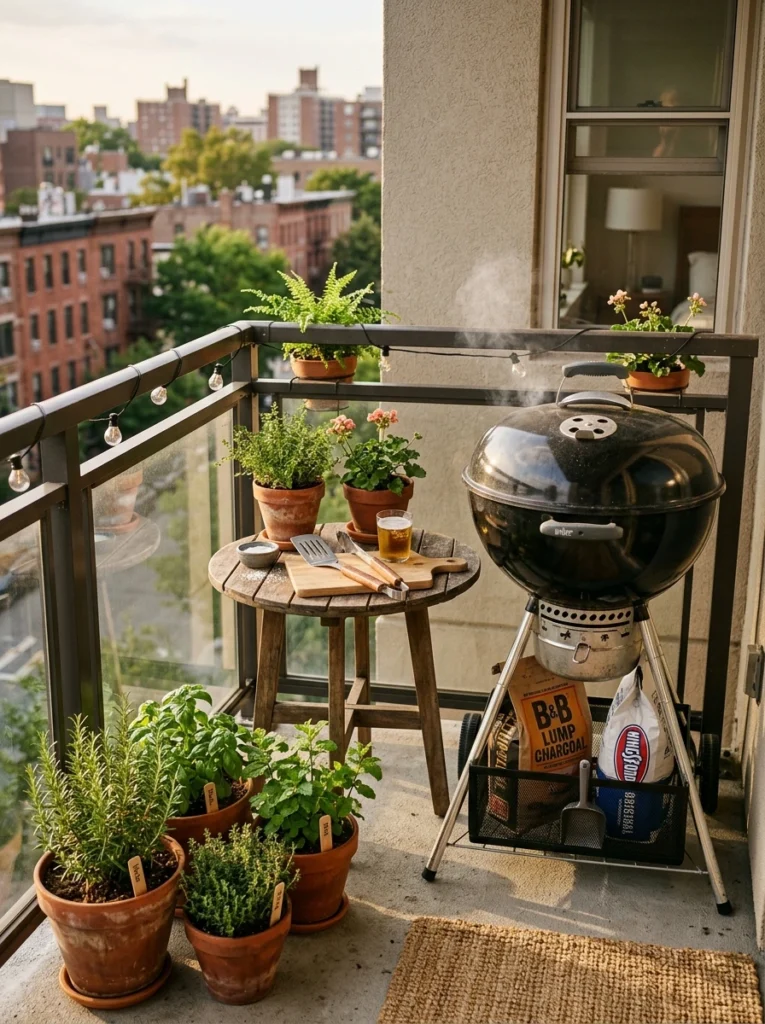
1. Simple patio grill station
This is the perfect starting point if you rent, have a small balcony, or just want to test the concept before committing. The core idea is a sturdy outdoor side table positioned next to your grill, fitted with a few S-hooks along the edge for hanging tongs, brushes, and a thermometer. Add a small basket underneath for charcoal bags or lighter fluid. The beauty here is portability — nothing is permanent, and you can rearrange or move it indoors in winter. Total cost can be as low as $20–$40 if you use a table you already own or find one secondhand.
2. Cinder block grill station
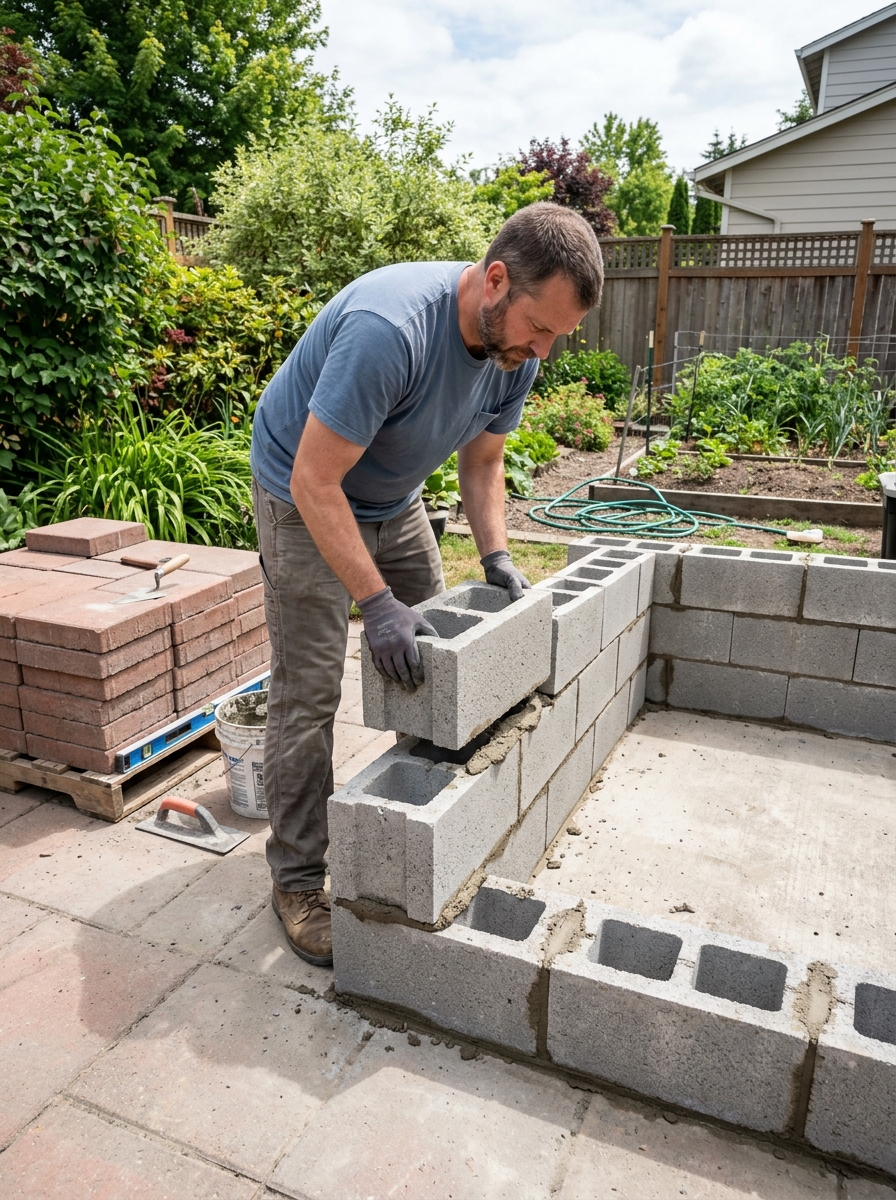
This is the most searched and most rewarding DIY option for good reason. Cinder blocks cost roughly $1–$2 each at any hardware store, they’re naturally heat-resistant, and they require zero tools or adhesive to stack into a functional structure. A basic L-shaped or U-shaped arrangement of two to three layers creates a stable platform for your grill and an adjoining prep counter.
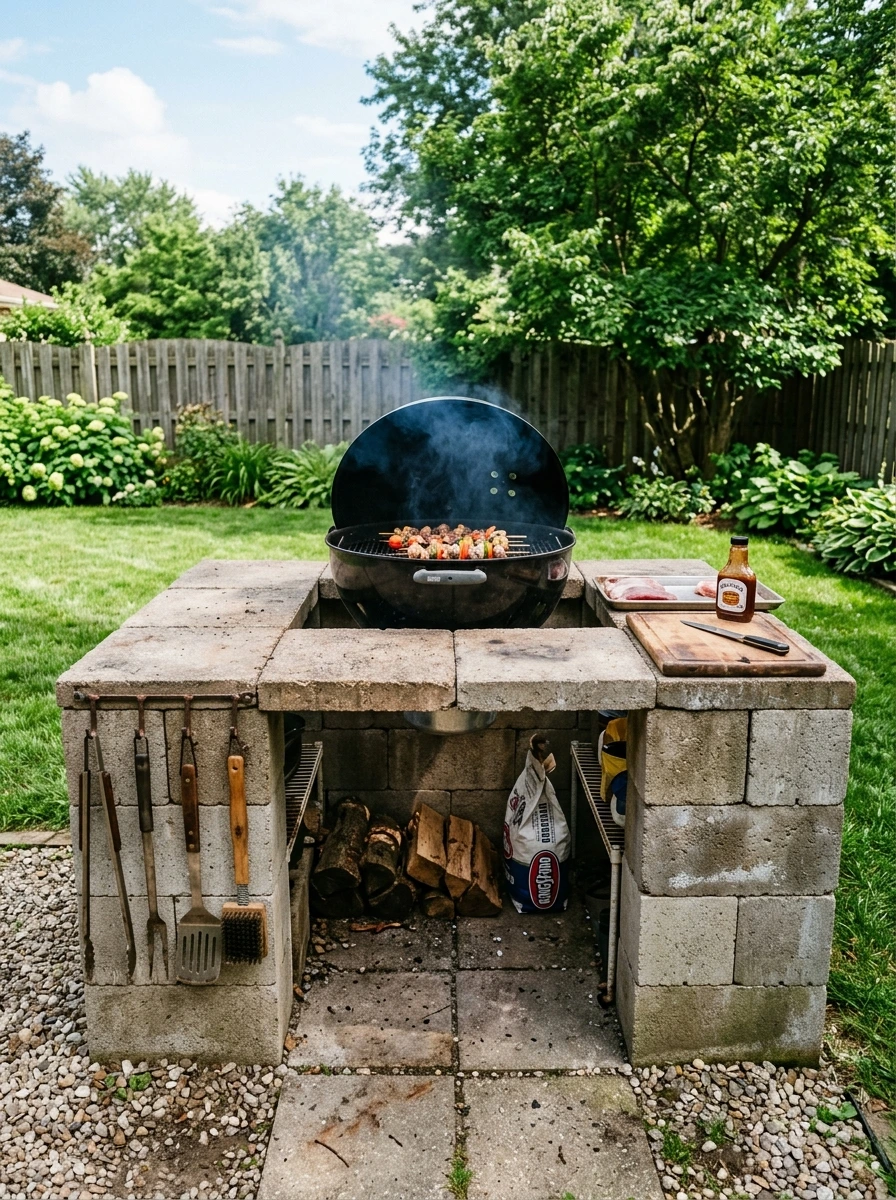
For a more permanent installation, you can fill the hollow cores with sand or use outdoor construction adhesive between layers. The top surface can be left as exposed block, covered with a concrete paver slab, or tiled with outdoor ceramic tile for a more finished look. The entire structure can be built in an afternoon for under $50, and it will outlast almost any store-bought grill cart.
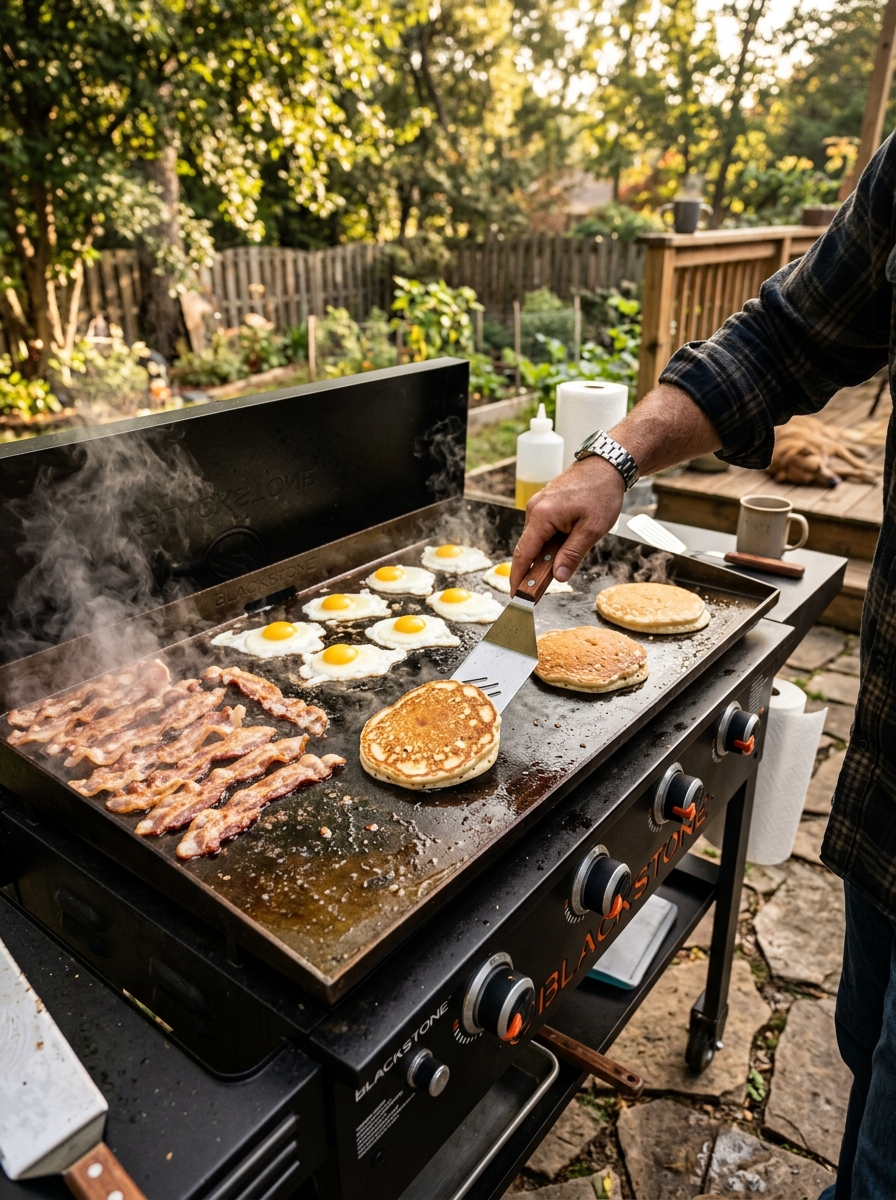
3. DIY Blackstone flat-top grill station
Flat-top griddles have surged in popularity because they can cook breakfast, stir-fry, smash burgers, and seafood all on one surface. But the Blackstone and similar griddles have one weakness: no built-in storage or side workspace.
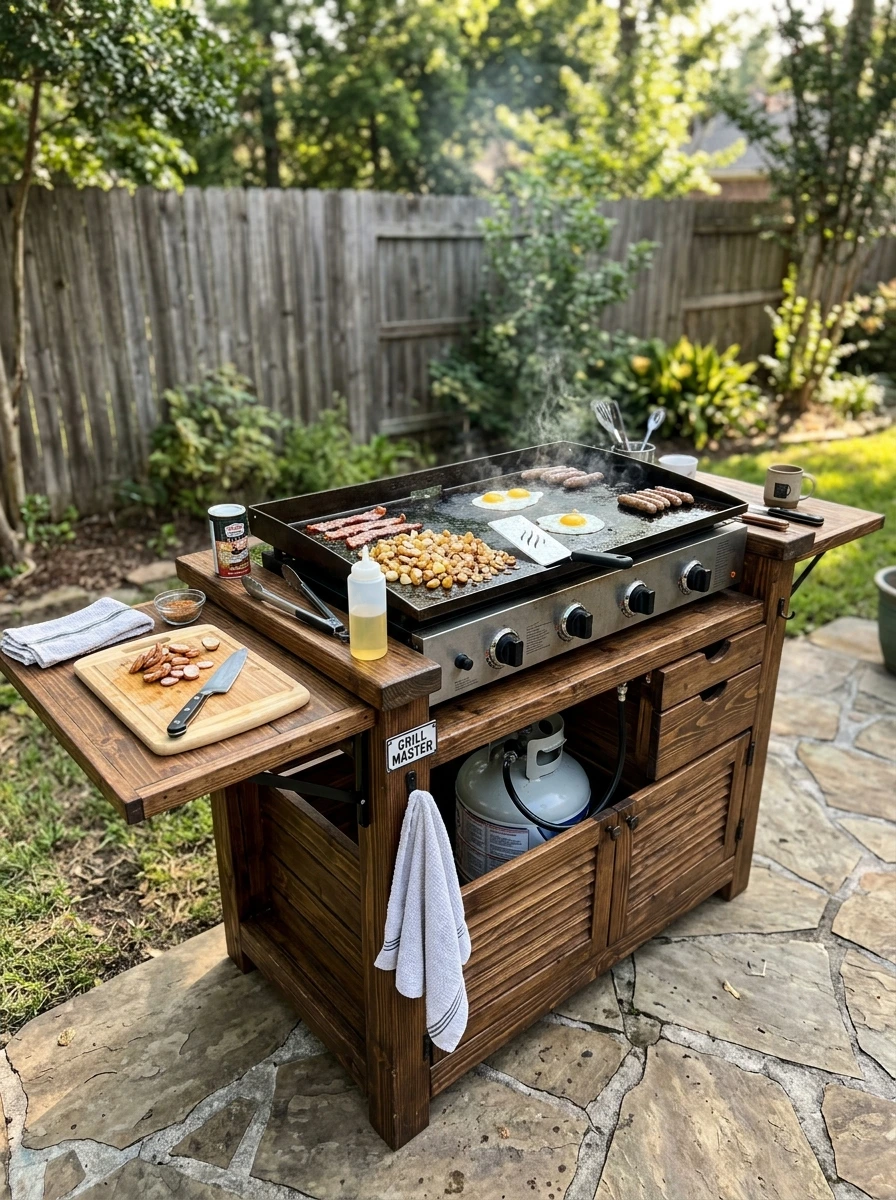
A DIY station solves this perfectly. Build a simple wooden frame from 2×4 lumber around three sides of the griddle, leaving the front open for access. Add a plywood shelf underneath for propane tank storage, and attach a fold-down wooden side table on each flank for plating food. Seal the wood with exterior-grade polyurethane to protect against grease and weather. This upgrade costs $60–$100 in materials and completely changes how the griddle functions.
4. Outdoor grill station with full storage
For those who grill frequently and want a more permanent setup, adding real storage elevates the station from a DIY project to a genuine outdoor kitchen. Repurposed kitchen base cabinets from a home renovation (often listed free on Facebook Marketplace or Craigslist) can be stripped, sanded, repainted with exterior paint, and fitted with stainless steel handles for a weatherproof outdoor cabinet.
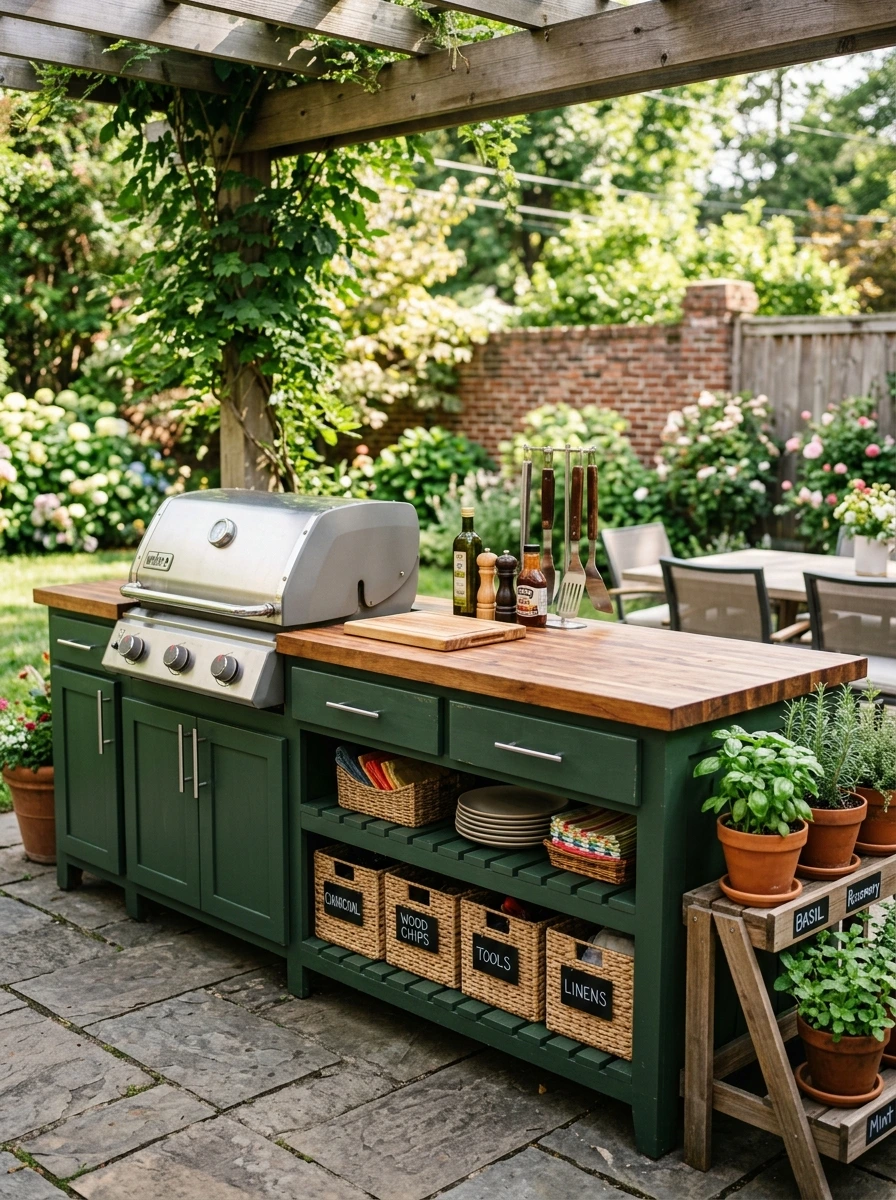
Add a corrugated metal or butcher block countertop across the top and you have a setup that rivals commercial outdoor kitchens at a fraction of the cost. Store charcoal, lighter fluid, marinades, grilling accessories, and even paper towels in organized, weather-protected compartments.
5. Pallet wood grill surround
Wooden shipping pallets are one of the most versatile free building materials available. A single heat-treated pallet (look for the “HT” stamp — avoid chemically treated ones marked “MB”) can be broken down into planks and reconstructed into a three-sided grill surround with a shelf.
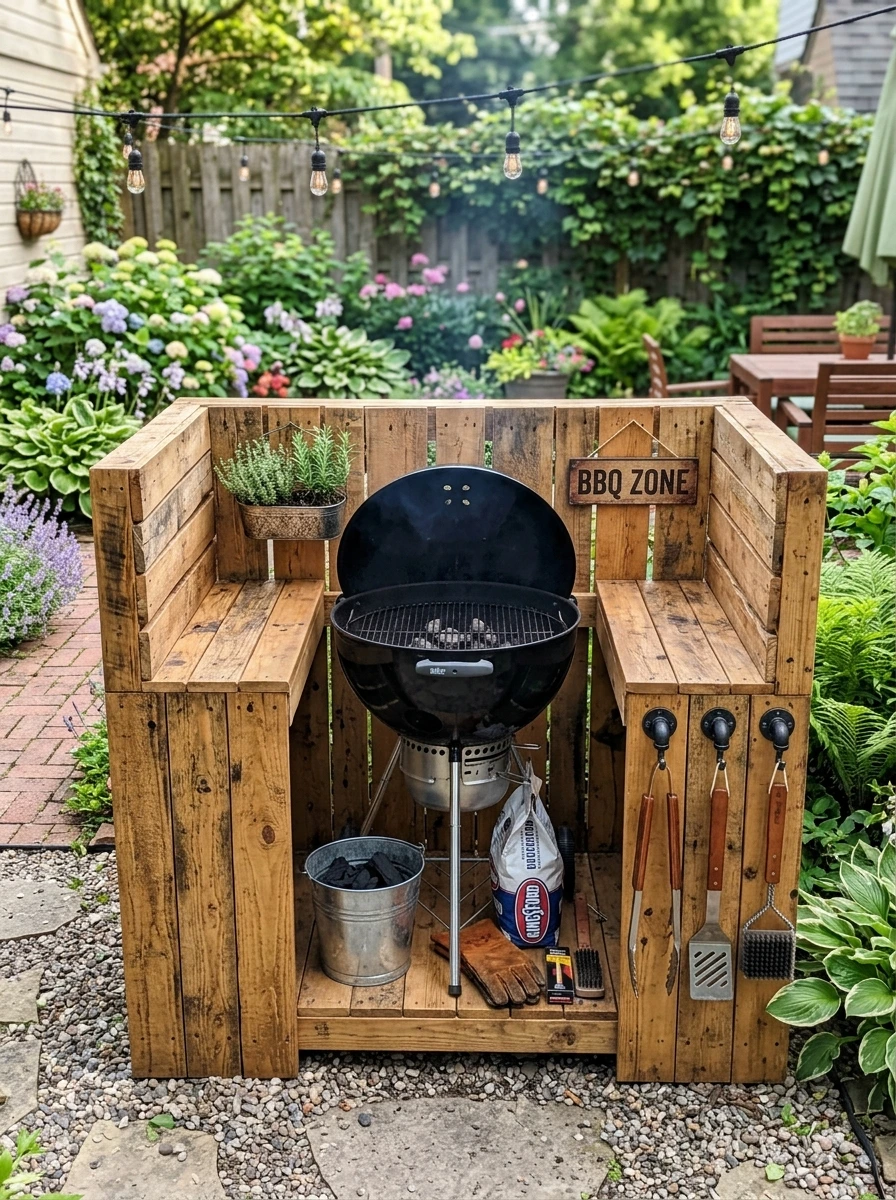
Sand the wood smooth, apply a weatherproof stain in a color that matches your outdoor furniture, and mount a few pipe-fitting hooks along the side for tools. This setup costs almost nothing if you source pallets for free from garden centers, furniture stores, or warehouses.
Step-by-step build guide — fully detailed
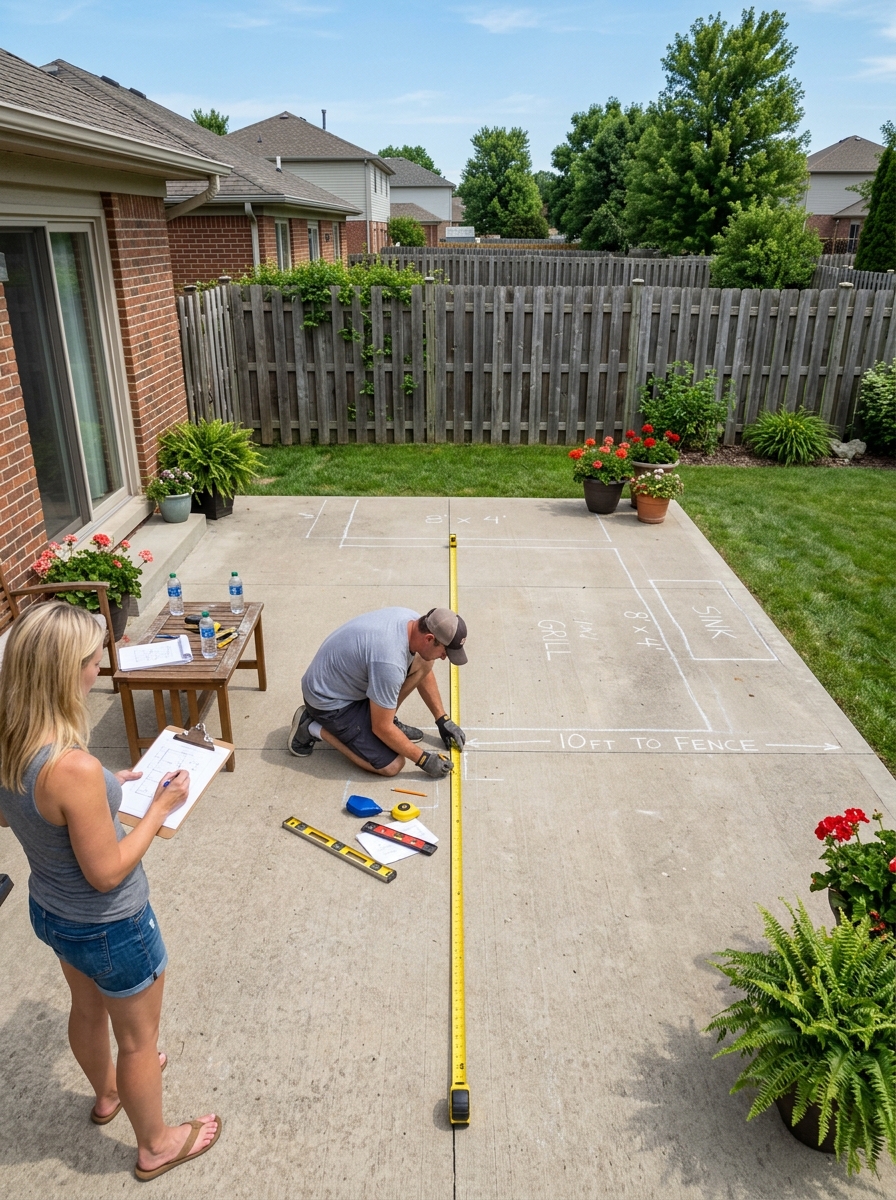
Step 1: Location planning Safety comes first. Your grill needs to sit at least 10 feet from any wall, fence, overhanging tree branch, or structure. Even with good weather, wind direction matters — position the grill so smoke blows away from your seating area and away from any open doors or windows. Check that the ground is level; even a slight tilt can cause uneven cooking on flat-top grills and is a stability hazard for tall charcoal grills. If you’re building a permanent structure like a cinder block station, lay a concrete paver base first rather than building directly on grass or soil, which can shift and settle over time.
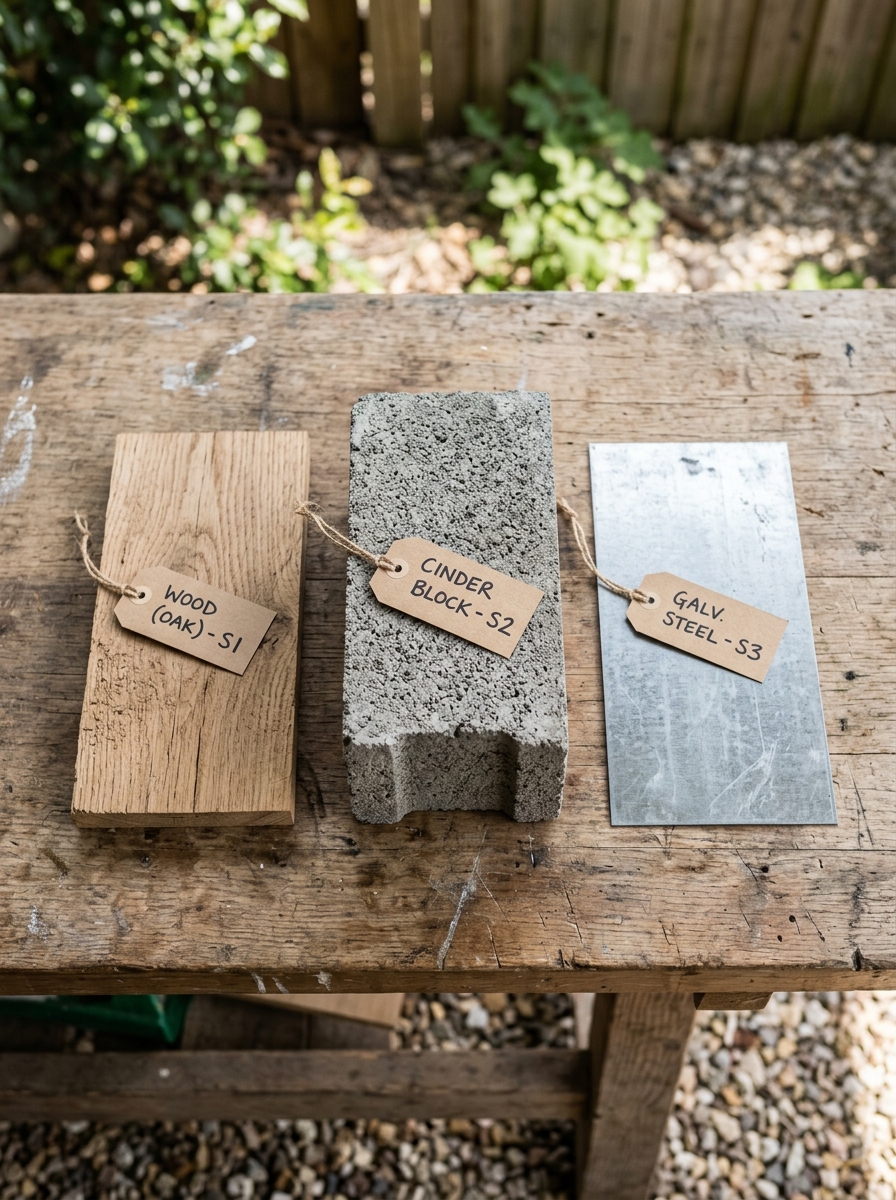
Step 2: Choosing your base material Wood is warm, easy to work with, and inexpensive, but requires sealing and ongoing maintenance to resist moisture and grease. Metal is durable and low-maintenance but conducts heat and can rust without a protective coating. Cinder blocks are the most heat-resistant and durable option and require virtually no maintenance, but they’re heavy and difficult to move once built. For most beginners, a cinder block base with a wooden side extension strikes the best balance.
Step 3: Structural assembly For a cinder block U-shape, you’ll need approximately 16–20 standard 8×8×16 inch blocks. Lay the first course in your chosen shape — a U-shape is most functional, giving you a back wall and two side walls with the front open for grill access. Stagger the second course so joints don’t align (the same principle as brick laying), which adds stability. Two courses high is usually sufficient for a standard kettle or gas grill. For a countertop surface, lay 12×24 inch concrete pavers across the top course — they’re flat, heat-tolerant, and inexpensive.
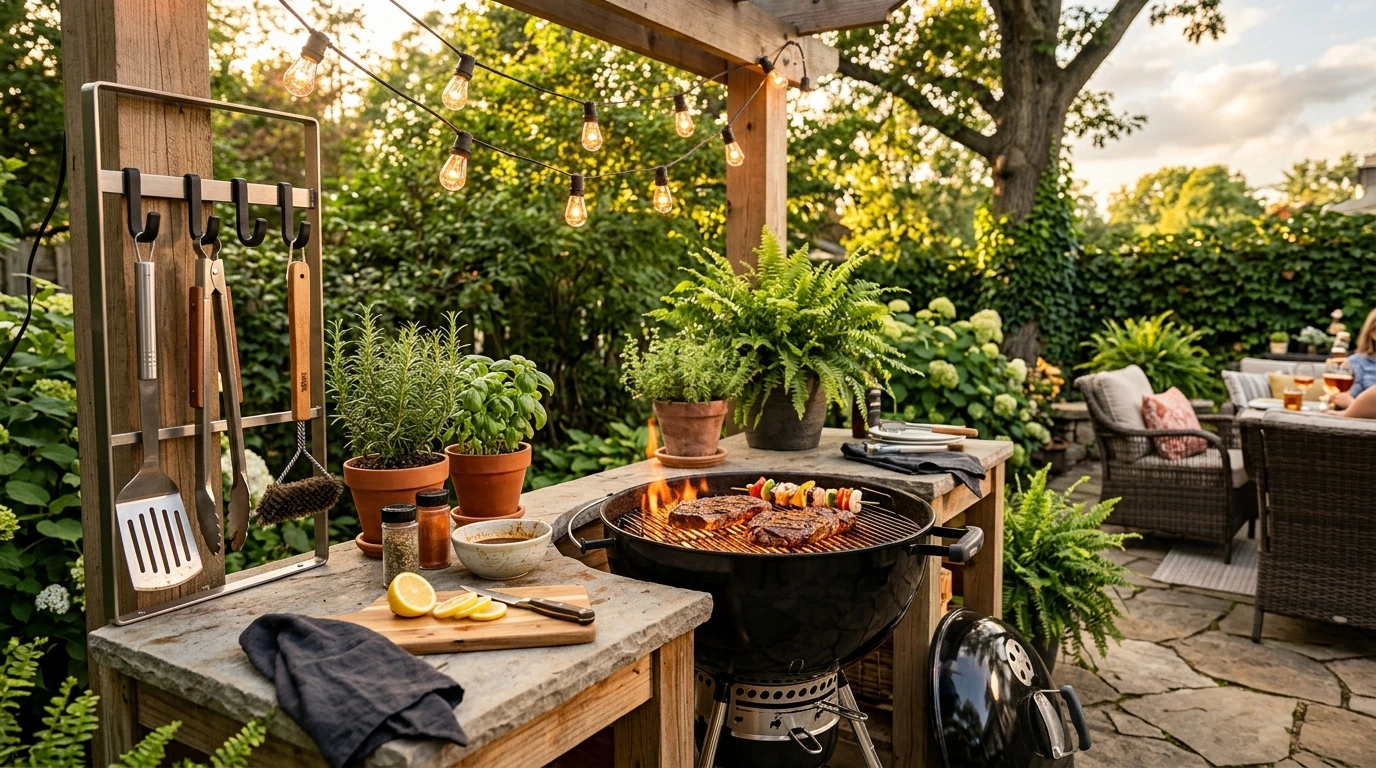
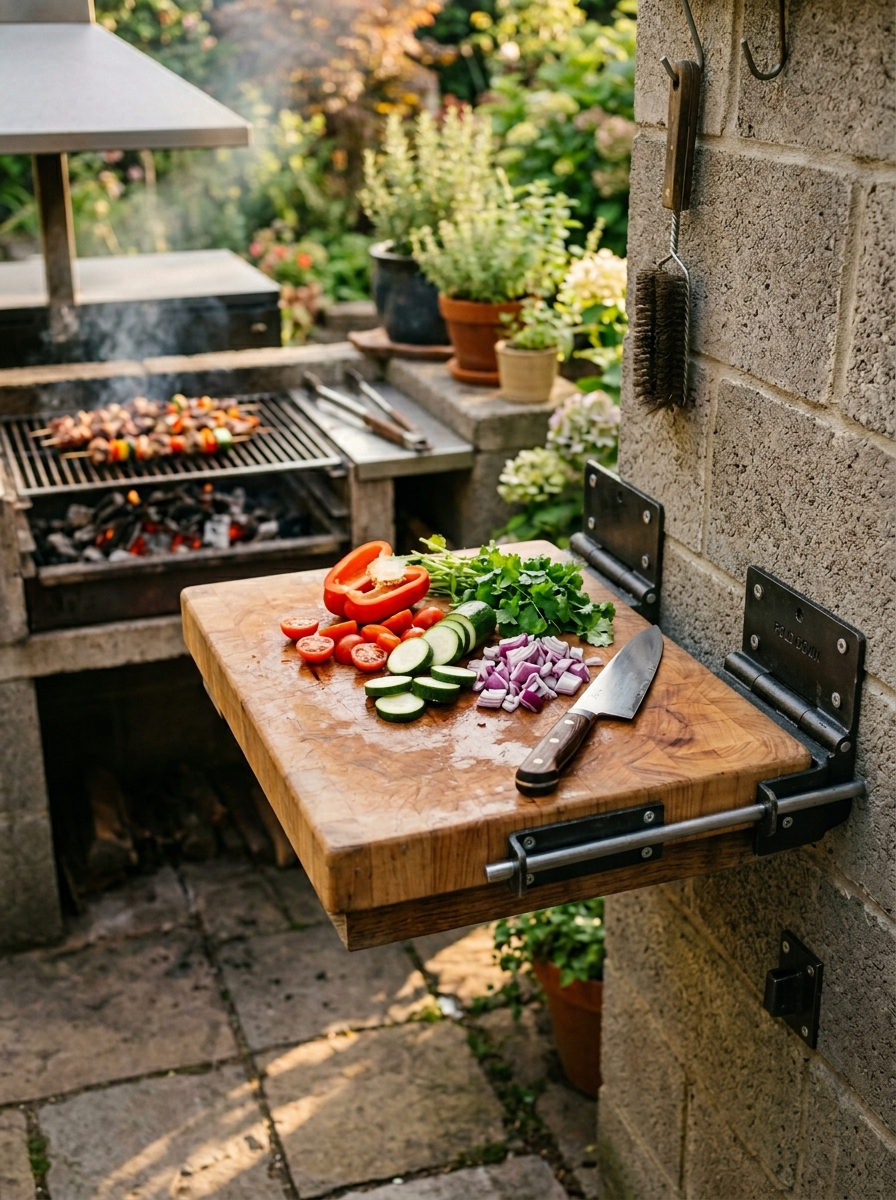
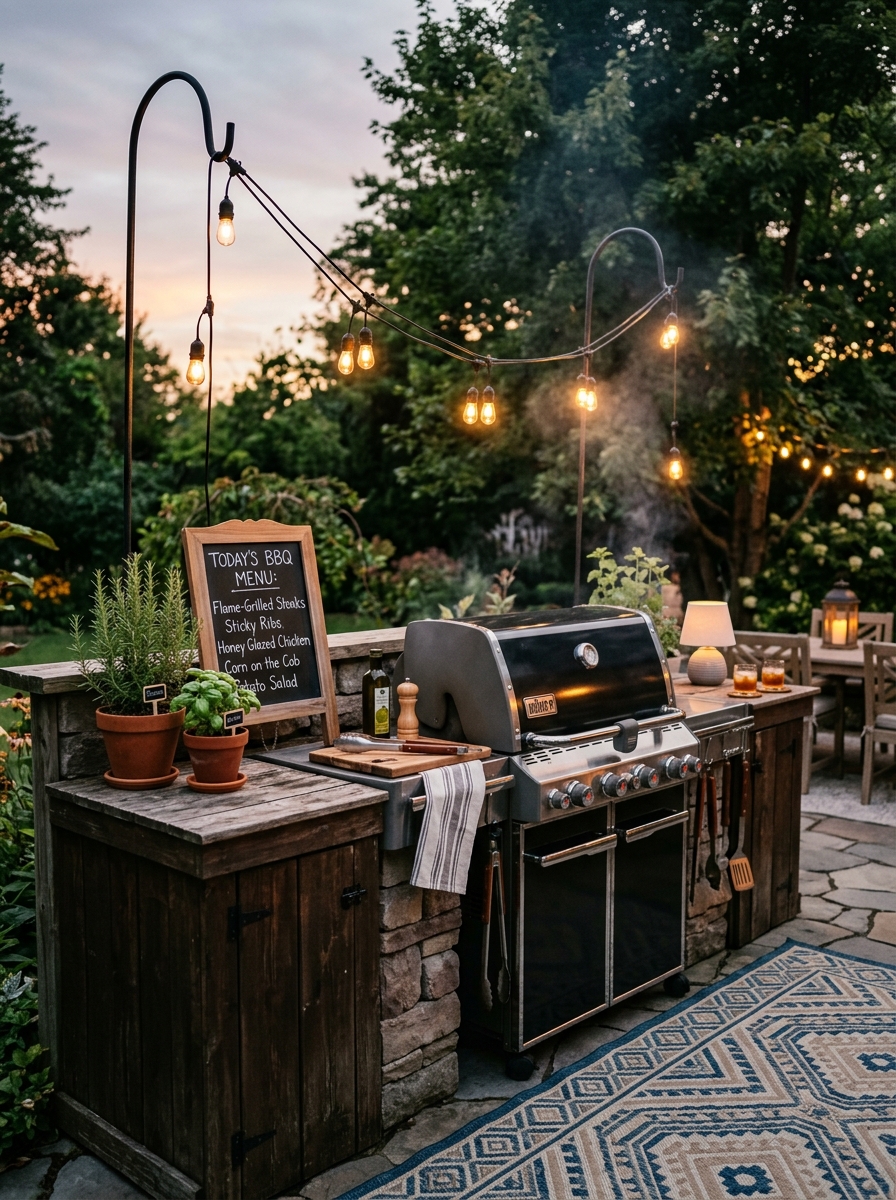
Step 4: Workspace and prep area A prep surface adjacent to the grill is arguably more important than the grill platform itself. Ideally you want at least 18–24 inches of flat workspace on one side. A butcher block cutting board clamped or screwed to a wooden bracket attached to the side of your station serves this purpose perfectly. Alternatively, a fold-down shelf on a piano hinge can be folded up when cooking and folded down when not in use to save space.
Step 5: Tool organization A grill station without organization quickly becomes a cluttered grill table. The most functional approach uses three zones: a hanging zone for frequently used Essential Grill Tools (tongs, spatula, brush) on S-hooks or a magnetic bar mounted at arm height; a surface zone for active items (thermometer, salt, oil bottle) on a small tray so they don’t roll off; and an under-station zone for bulky items (charcoal bag, propane tank, spare grates) in bins or on a lower shelf. Label your bins if you share the grill with family members — it sounds minor but makes a noticeable difference in how quickly everyone can find things.
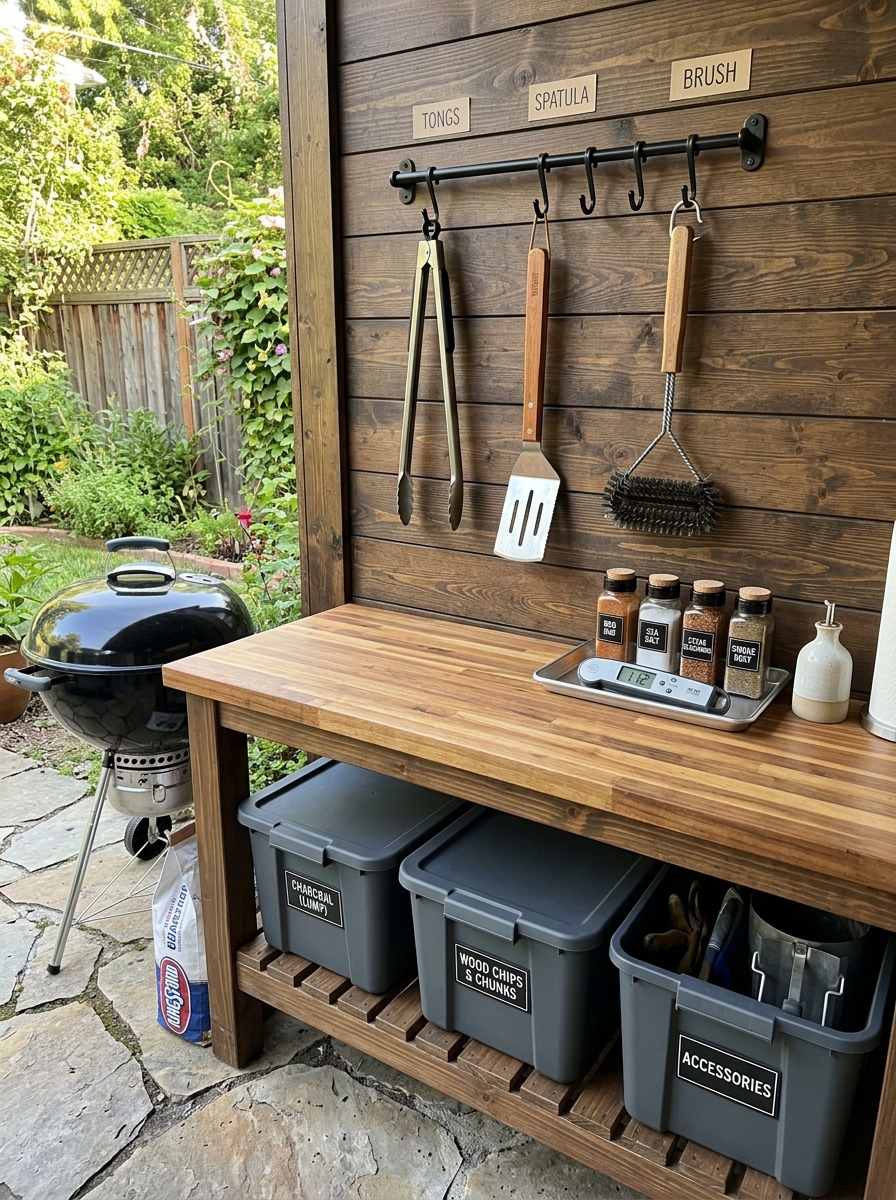
Step 6: Finishing and decoration This step is what separates a functional grill station from one that becomes a genuine gathering point. String lights strung overhead on a pergola or between two shepherd’s hooks create instant ambiance after dark. A weatherproof outdoor rug defines the cooking zone and protects your patio surface from grease drips. Potted herbs — rosemary, thyme, basil — placed near the station are both decorative and genuinely useful while cooking. A small chalkboard sign listing the day’s menu or BBQ rules adds personality. These finishing touches cost $30–$60 total and make a dramatic visual difference.
Grill types — which is right for your station
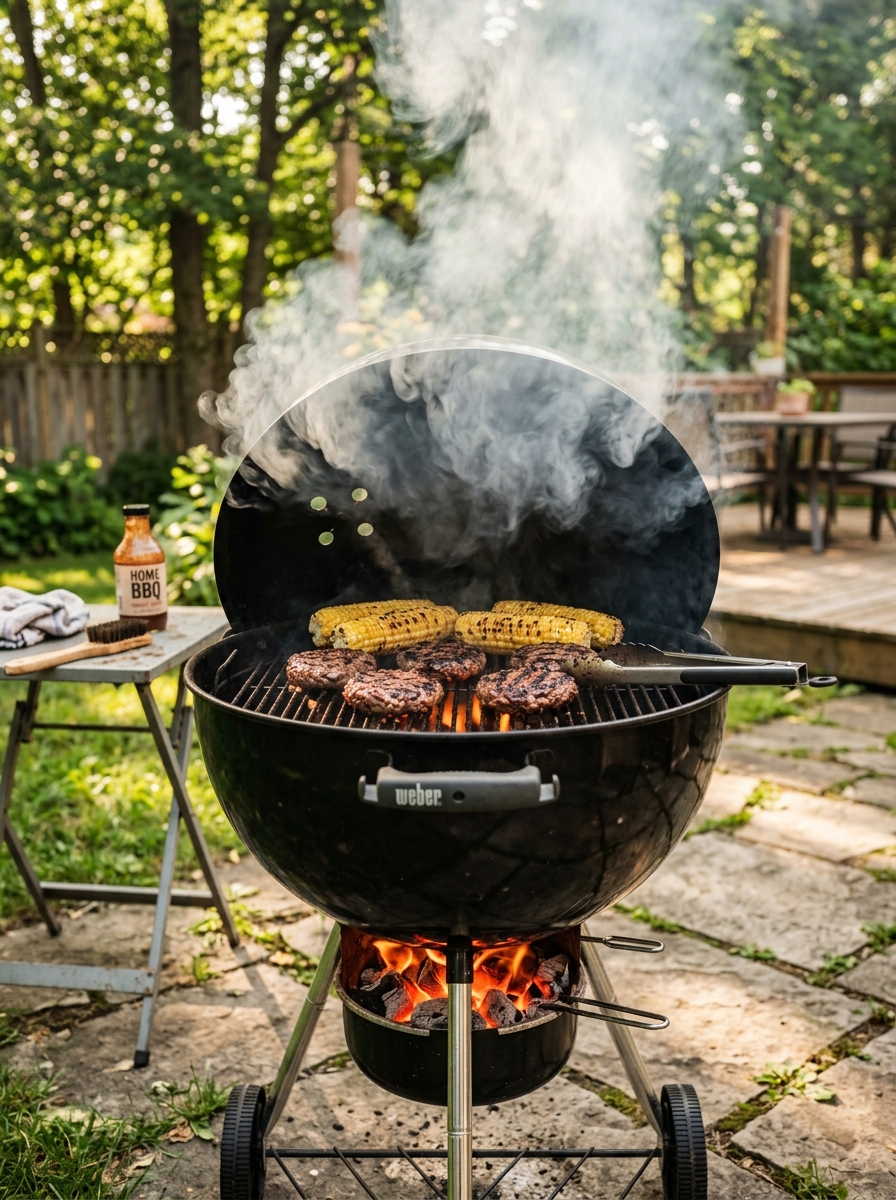
Charcoal grills reward patience. The heating process takes 20–30 minutes, but the flavor payoff is real — the Maillard reaction combined with wood smoke creates a depth of flavor that gas simply cannot replicate. They’re also the cheapest entry point, with quality kettles available for $40–$80. Maintenance is straightforward: empty the ash catcher after every session and brush the grates while warm. For a cinder block station, charcoal grills sit beautifully on the flat top course without any modification.
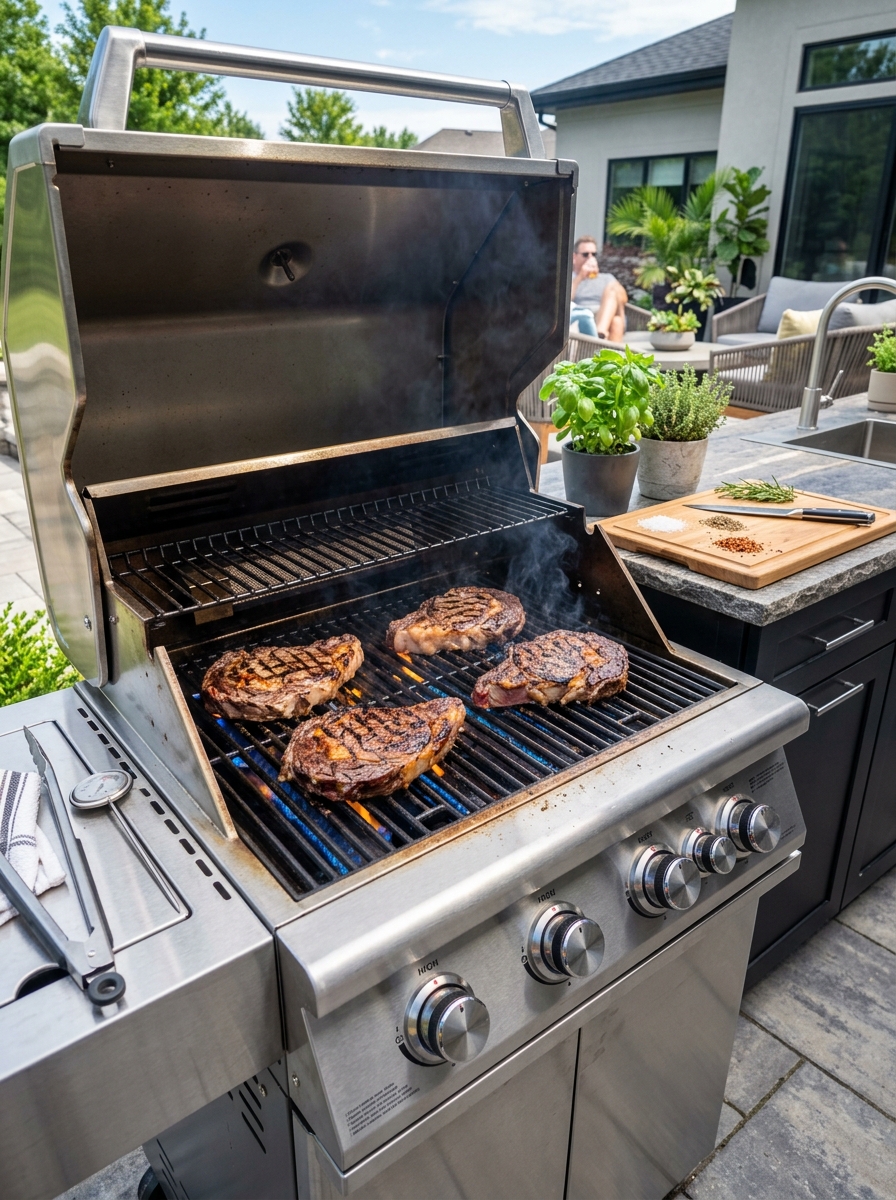
Gas grills are the practical choice for weeknight cooking. Turn a knob, wait five minutes, and you’re cooking — no ash, no lighter fluid, easy temperature zones. The tradeoff is cost (entry-level quality starts around $150–$200) and a flavor profile that, while good, lacks the smokiness of charcoal. A gas grill pairs best with a station that has space for the propane tank stored underneath in a ventilated cabinet area.
Flat-top griddles are the most versatile option and the fastest growing category in backyard cooking. The large, flat cooking surface means you can cook an entire breakfast (eggs, bacon, pancakes, hash browns) simultaneously, or smash burgers, fried rice, and grilled vegetables all at once. They require a bit more cleaning discipline — scraping and seasoning the surface after each use — but once that becomes habit, they’re no more work than any other grill.
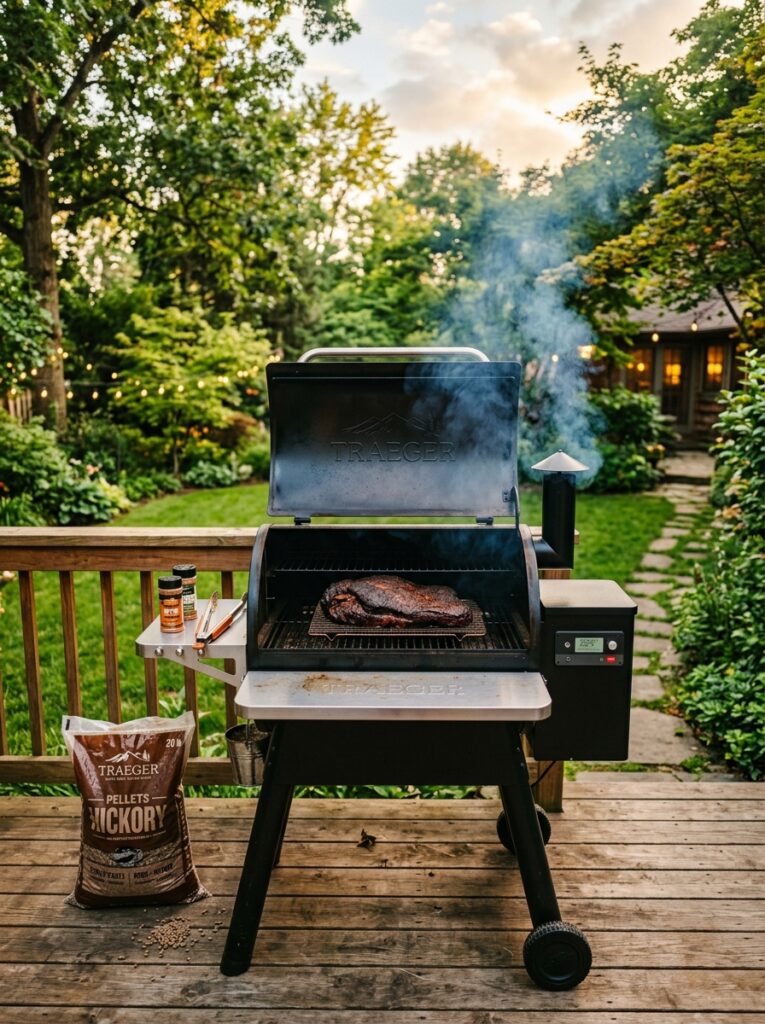
Pellet grills represent the premium tier of backyard cooking. They burn wood pellets fed automatically by an auger, maintaining precise temperatures over long cooks — perfect for brisket, ribs, or pulled pork. They’re more expensive ($300–$600 and up) but combine the flavor of wood smoke with the convenience of gas. Worth considering as an upgrade once you’ve established your station and know how seriously you take grilling.
Essential accessories — what actually matters
Rather than buying every gadget available, focus on the items that genuinely improve results. An instant-read meat thermometer is the single most impactful tool you can own — it eliminates guesswork and prevents both undercooked and overcooked meat entirely. A good pair of long-handled locking tongs (16 inches minimum) keeps your hands safely away from heat while giving you precise control. A stiff grill brush used while the grates are still warm after cooking extends grate life dramatically. Heat-resistant silicone gloves rated to at least 500°F give you the confidence to handle grates, move coals, and adjust vents without hesitation. A quality grill cover tailored to your specific grill model is the single best investment for longevity — UV exposure, rain, and frost degrade unprotected grills quickly.
Money-saving strategies that actually work
The biggest savings come from timing. Grills go on deep clearance (30–50% off) in August and September as retailers clear summer inventory. Buying a grill in late summer for use the following spring is one of the best value moves in outdoor cooking. For building materials, check Facebook Marketplace, Nextdoor, and Craigslist regularly — people renovating kitchens often list free or cheap cabinets, wood, and hardware that translate directly into grill station components. For cinder blocks specifically, buying in-store rather than having them delivered saves significantly on per-unit cost since delivery fees for heavy materials are substantial. Start with the minimum viable station — grill plus one prep surface plus tool storage — and add elements over two or three seasons as your budget allows. This approach also lets you discover what you actually use versus what looks good in planning.
Safety — the non-negotiable checklist
Never operate any grill, charcoal or gas, in an enclosed space — carbon monoxide accumulates rapidly and is odorless. Keep a fire extinguisher (Class K for grease fires) within arm’s reach of your station, not inside a cabinet where it’s hard to access quickly. Check propane connections annually by brushing soapy water over all fittings — bubbles indicate a leak that must be fixed before lighting. Position your station so there is always a clear path away from the grill in every direction — never box yourself into a corner. Keep children and pets at least six feet from an active grill, and establish this as a visible boundary using your outdoor rug or a chalk line on the patio.
In this complete guide, you’ll learn:
- How to build a DIY grill station cheap
- Best patio grill station ideas
- Step-by-step methods (including cinder block grill station)
- Must-have tools & accessories (perfect for adding Amazon links)
- Honest reviews of popular grill setups
Let’s get started 🔥
🌿 Why You Need a Grill Station
A proper grill station is more than just a place to cook—it becomes the heart of your outdoor space.
Benefits:
- Keeps everything organized
- Makes cooking easier and faster
- Adds aesthetic value to your patio
- Great for hosting BBQ parties
If you’re using a basic grill setup right now, upgrading to a DIY outdoor grill station will completely change your experience.
💡 Best Budget Grill Station Ideas
Here are some trending and practical grill station ideas you can build without spending too much:
1. Simple Patio Grill Station
Perfect for beginners.
- Small table + grill
- Add hooks for tools
- Use storage baskets
👉 Budget: Very low
👉 Best for: Apartments & small patios
2. Cinder Block Grill Station (Most Popular DIY)
A cinder block grill station is one of the cheapest and most durable options.
Why it’s great:
- Very affordable
- Easy to build
- Heat-resistant
- Customizable
👉 You just stack blocks and place your grill on top—no advanced skills required.
3. DIY Blackstone Grill Station
If you own a flat-top grill, a DIY Blackstone grill station is a great upgrade.
Features:
- Side shelves
- Storage space
- Prep area
👉 Best for serious BBQ lovers
4. Outdoor Grill Station with Storage
- Add cabinets or shelves
- Use plastic bins or wooden crates
- Store charcoal, tools, and accessories
👉 Makes your grilling setup clean and professional
🛠️ How to Build a DIY Grill Station (Step-by-Step)
Let’s create a simple DIY grill station cheap:
Step 1: Choose Your Location
- Flat surface
- Away from walls (safety)
- Near seating area
Step 2: Pick Your Base
Options:
- Wooden table
- Metal stand
- Cinder blocks (recommended)
Step 3: Build the Structure
For Cinder Block Setup:
- Arrange blocks in rectangle shape
- Leave space for grill
- Add a slab or metal top
Step 4: Add Workspace
- Install a side table
- Use wood plank for prep area
Step 5: Organize Tools
- Hooks for spatula/tongs
- Small shelves
- Storage bins
Step 6: Decorate (Optional but Recommended)
- Add plants 🌿
- String lights ✨
- Outdoor rug
⭐ Budget Grill Reviews (Beginner-Friendly Picks)
Here are some general recommendations you can link to:
1. Charcoal Grills
Best for:
- Smoky flavor
- Traditional BBQ lovers
Pros:
- Affordable
- Easy to use
Cons:
- Takes time to heat
2. Gas Grills
Best for:
- Quick cooking
- Convenience
Pros:
- Fast heating
- Easy temperature control
Cons:
- Slightly expensive
3. Flat Top Grills (Blackstone Style)
Best for:
- Cooking multiple foods
- Large gatherings
Pros:
- Versatile
- Big surface
Cons:
- Needs more space
💸 Budget Tips (Save More Money)
- Use recycled wood
- Buy second-hand grills
- Start simple, upgrade later
- DIY instead of buying ready-made stations
🌟 Common Mistakes to Avoid
❌ Placing grill too close to wall
❌ Ignoring airflow
❌ Using weak materials
❌ No storage planning
👉 Always focus on safety + durability
🎯 Final Thoughts
Building your own outdoor grill station is one of the best budget DIY projects. Whether you go for a cinder block grill station or a simple patio grill station, you can create something functional and beautiful without spending a lot.
Start small, upgrade over time, and most importantly—enjoy the process 🔥
yep